3 Solutions for Complex Situations
Recently I've faced three challenging scenarios:
- A client wanted bigger, stronger legs. Problem was, he had horrible knees that prevented him from squatting or lunging.
- An athlete injured his hand and couldn't hold weights, but he needed to keep training hard.
- A Figure competitor who was already eating clean and doing metabolic workouts wasn't seeing any further fat loss. And her show was looming.
Believe it or not, we were able to work around these issues and keep their results coming! Here's how.
This is a common problem that plagues many lifters, and a lot of coaches and trainers just turn these clients away. But what kind of coach would I be if I couldn't develop creative ways for motivated athletes to successfully make gains while dealing with limitations?
As JC Santana says, "A good coach should be able to effectively train someone in an elevator if he had to." Put simply, as coaches we need to be creative, especially for folks who can't do the usual stuff because they possess a pair of wrecked knees.
One of my favorite knee-friendly strength training exercises is the half-squat, half-deadlift.
If you have bad knees, usually any movement that requires a lot of knee bend, such as a squat or lunge, will be painful. You'll notice that this exercise doesn't force the knee to bend all that much. Instead, it emphasizes more involvement from the posterior chain (glutes and hamstrings) muscles.
Another fantastic, knee-friendly lower body exercise is the anterior reaching lunge. Let me warn you, this exercise will make your glutes very sore the first time you try it! Just remember to go as heavy as you can without rounding your back.
Need a few more knee-sparing exercises? Check out my article, Joint-Friendly Training.
Workout Program for Bad Knees
Here's a sample lower-body training program for those T NATION readers with jacked-up knees:
Day A
| Exercise | Sets | Reps | Rest | |
|---|---|---|---|---|
| A | Romanian Deadlift | 4 | 5-8 | 90 sec. |
| B1 | Single-Leg Hip Bridge (Bent Leg) | 3 | 8-12 | |
| B2 | Reverse Sled Drag (low stance) | 3 | 40 yd | 1 min. |
| C | Calves | 2 | 20-25 | 30 sec. |
| D | Forward Sled Drag (for conditioning) | 2 | 100 yd. | as need |
Day B
| Exercise | Sets | Reps | Rest | |
|---|---|---|---|---|
| A | Single-Leg Half-Squat Half-Deadlift (40lb weight vest) | 3-4 | max | 1 min. |
| B1 | Single-Leg Hip Bridge (straight leg) | 3 | 8-12 | |
| B2 | Reverse Sled Drag (tall stance) | 3 | 40 yd. | 1 min. |
| C | Calves | 2 | 20-25 | 30 sec. |
| D | Sled Push (for conditioning) | 4 | 50 yd. | as need |
Notes
- Go as heavy as possible on sled exercises.
- Anterior reaching lunge can be a substitute for RDLs or bench hip bridges.
- Stay in a pain-free range of motion on all exercises.
- All calf exercises are okay and can be used for training variety.
- If you have bad knees, take your Flameout®!
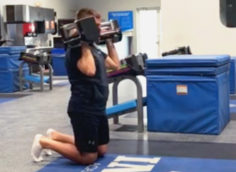
To the serious lifters who are wondering how you're going to lift heavy while dealing with that nasty finger, hand, wrist, or elbow injury that prevents you from holding anything, I've got one piece of equipment you must get ASAP – ab straps. Yep, the straps you hang from to do leg raises.
Check out these exercises using ab straps that I've used to help my injured athletes lift big weights while working around injuries and limitations:
Tall Standing Rows and Bent-Over Vertical Rows with Ab Straps

As you can see by the pics to the right, the ab straps eliminate the need to hold anything in your hand. Plus, even you if you have an elbow injury, you can usually still perform this and all the other movements below because the ab strap is placed above the elbow joint, eliminating any stress.
And in regard to the Bent-Over rows, yes, I know that your body is standing vertical, but the resistance load is coming from above your head, which is comparable to a lat pulldown. So, technically it's a vertical pull.
Now, I realize the range of motion of these pulling exercises is slightly less than using a handle. But keep in mind that this guy was unable to hold anything. So, I think using a slightly reduced range of motion is still better than doing no pulling at all!
On a side note, these pulling variations are also great for wrestlers and MMA fighters!
Slide Board Pec Fly/Push-Up
Creating effective upper-body pushing exercises to work around an injury that limits you from holding anything or putting pressure on your wrists is tricky. Here's one way to make it work.
It's no joke, even if you're not injured! If you don't have a slide board, no problem. Just find a tile or waxed wood floor and place socks under your arms in the same manner as shown in the video.
Rotary Cable Pull with Ab Straps

This exercise has its roots in my MMA and grappling conditioning programs. That said, with a little modification it's a great way to train the all important "core" and perform some rotary training if you can't hold a cable handle.
Reverse Sled Pull with Ab Straps
Abs straps can even be used in conjunction with sled and tire dragging. Check out the reverse sled pull to the right. Or work on your tan outside with a tire!
Hip Dominant Sled Drag with Harness

You're going to need a heavy-duty shoulder harness for this one!
Wrestler's Sled/Tire Drag with Ab Straps
Full props to JC Santana for showing me this one. This exercise is one of my personal favorites. It's great because it integrates both upper-body pushing muscles along with the driving of the legs to move the sled or tire. If you're a fighter or wrestler, give this one a shot. It'll turn you into a friggin' beast!
This last scenario is actually about my girlfriend, Alli McKee. Alli's issue can be summed up with one word: adaption.
Long before Alli ever met me, right up until she began training for her Figure show, all she ever did was perform metabolic workouts that would bury even the most elite CrossFitter. Alli's body had became so adapted to this type of training that it learned to be more energy conservative. Therefore, the workouts were no longer effective at burning fat.
As they say, everything works, but nothing works forever. So I had to find a way to offset this adaption process so that we could later use metabolic training to re-spark fat loss. In other words, for a short time I had to transform her from a gas efficient Toyota Prius to a gas guzzling Ford F350.
So, I thought about who were the most energy inefficient athletes on the planet – bodybuilders and powerlifters. Bodybuilding had much more carryover to the sport of Figure, so I started training her like a bodybuilder. We followed a four-day, upper body/lower body split.
We stayed within the general bodybuilding/hypertrophy range of 3-5 sets of 6-12 reps. I paired up exercises to increase rest time between sets. We kept the intensity of each exercise high and we did almost zero conditioning except for some sprints to maintain some level of quickness and athleticism.
After six weeks of teaching her body not to conserve energy, but to "give it all" every time, she not only dropped body fat but gained five pounds of muscle! We then began to re-integrate the metabolic training protocols back into her program.
It was amazing to watch her actually get gassed during the metabolic exercises she once finished with a smile on her face. Although it hurt her ego, we both knew it meant that her body was no longer adapted to this training and it would help to actually burn fat this time around.
It worked like a charm because as you can see in the pictures from her show, Alli got lean and looked amazing, leaving me both a proud trainer and a damn lucky guy!
I'm well aware that some folks reading this may disagree with my approach to solving these problems. But whether you agree or not, these approaches worked! Listen, I'd don't care about always being right; I just care about always being helpful.
I hope these real-world solutions to common problems help you as much as they helped my clients!
T Nation earns from qualifying purchases as an Amazon Associate. Read more about our policy.
related posts

From Brain to Biceps

Tip: Fix Your Power Clean with Altitude Landings
Overload Chest Training: 7 New Exercises