In Part 1, I told you my life story, reflecting on my favorite color and the fact that I was raised by wolves. Eventually, I got around to my first eight tips on how to keep your shoulders healthy. My creativity is a little lacking, so I haven't got any more stories to tell you, but I can at least offer eight more shoulder savers. Enjoy.
If you're going to be doing lateral raises, one great way to ensure long-term shoulder health is to position the upper arm in the same plane as the scapula. If you do the exercise directly out to the sides, your arms are in the frontal plane, and the humerus is actually extended, placing the humeral head anterior to the acromion process of the scapula.
This position greatly increases the likelihood of the humeral head pinching the tendons of your rotator cuff underneath the acromion process as you raise your arms. A simple solution is to just move your arms forward about 30° so that it's in the scapular plane.
If you want to make it extra safe, you can do the exercise with your thumbs up; this repositioning will externally rotate your humerus, giving the humeral head and rotator cuff a little more room to breath under that acromion process.
Let it be known, the era of the 800 daily crunches is over. And, this isn't just because we're concerned about hip and lower back health; would you believe that you can actually screw up your shoulders with inappropriate core training? Here's what happens...
The rectus abdominus runs from your rib cage down to your pelvis; when it shortens, it pulls the rib cage down toward your feet. So, as you can imagine, if the rectus abdominus is tight, it can pull the whole rib cage too far down – making you look more like Quasimoto than someone who actually trains hard.
Beyond just the fact that poor posture isn't all that aesthetically appealing and actually makes you appear smaller, excessive kyphotic postures have biomechanical implications at the shoulder girdle. When your thoracic spine gets too kyphotic, the scapulae abduct (protract) so that they slide outward on the rib cage (toward your arms). This repositions the aforementioned acromion process, as the entire scapula becomes anteriorly tilted. An anteriorly tilted scapula dramatically increases the risk of impingement on those rotator cuff tendons.
How do we counteract this problem? As Mike Robertson discussed in detail in Core Training for Smart Folks, we need to prioritize exercises for the posterior fibers of the external obliques, as these exercises will posteriorly tilt out pelvis without pulling the rib cage downward.
And, by increasing the strength of these muscles, we'll take some of the burden off the rectus abdominus and shift things back into balance. When I see this problem, I drop all traditional trunk flexion movements (pulldown abs, crunches – and people should know to not do sit-ups by now) and replace them with pure stabilization movements (prone and side bridge) and "lower ab" exercises, most notably the reverse crunch.
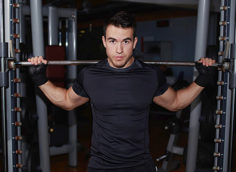
The regular ol' Olympic bar will always be a mainstay in the quest for size and strength, but there are times when it's to your advantage to get away from it temporarily. You see, with bench pressing and overhead pressing, it doesn't give your arms any "wiggle room" – especially with regards to the forced internal rotation at the shoulder – in terms of their positioning during the lift.
Likewise, if you're using the straight bar exclusively for back squats, the loaded, externally rotated, abducted position (referred to as the "at-risk" position by many sports medicine professionals) can beat those taters up over time, too. Fortunately, there are some pretty easy solutions on this front.
For benching and overhead pressing, simply switch to dumbbells for a week or two here and there. To increase the "deload," you can use a neutral grip, limit range of motion, and/or perform the dumbbell bench presses on a stability ball.
For a back-squatting substitute, you've got several options, the best of which would be switching to a different kind of bar that will allow you to perform the lift with your arms in a more forward and down position. Good choices include the giant cambered bar, safety squat bar, and even the cambered bar (as pictured below). The cambered bar has a slight "dip" in the middle so that your hands are held slightly lower than on a traditional squat. It's a good shoulder saver that won't affect the mechanics of the movement too much.
If you don't have access to these special bars, don't worry; just move to front squats, or drop squats for a week altogether and go after a deadlift or single-leg variation instead.
Just as getting away from the straight bar can be a great way to keep your shoulders healthy, dropping full range of motion every so often is also a great idea. Excellent substitutions for these weeks include floor presses, board presses, pin presses, overhead rack lockouts, and carpet presses.
To combine Shoulder Savers #11 and #12 for a "double deload," go with dumbbell floor presses
I'm going to have to be intentionally vague on this one. Think back to the "23/1 Rule" I discussed in Part I. This rule says that you can do everything right in the gym, but use the other 163 or so hours per week to royally screw things up.
In addition to the generally lousy posture problems we covered, it's also important to consider general overuse patterns that can occur around the house, in the car, at the office, and on the athletic field.
Do you find that you're always reaching for the phone with one hand? Do you lean on one elbow? Always carry your backpack/purse on one side? These are the things that we want to minimize.
Now, some things are just going to be unavoidable. You have to use the mouse on one side of your computer, throw with your dominant arm, shift gears in the car with your right hand, and write with your good hand.
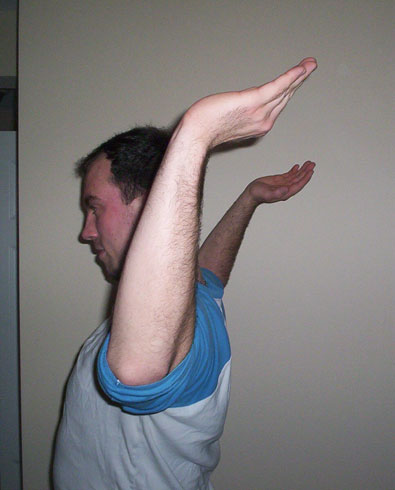
As an interesting aside to all of this, if you've got a buddy who was very involved in some unilateral overhead sport like baseball, tennis, or javelin, run these tests on him. I bugged my buddy Tony Gentilcore to help out with this; Tony was a Division 1 pitcher in college and had some pro tryouts about six years ago. As you can tell, he got kind of excited about being in the spotlight again, so he made sure to dress the part with a baseball shirt.
- Have him put his arms up in the air with the elbows flexed to 90° (think of the position he'd assume if he was taking an oath in court, but with both arms up in the air).
- Next, see how far he can externally rotate his upper arms; by watching from the side, you'll be able to see which arm goes back further.
- I'll bet you a bathtub full of Low-Carb Metabolic Drive pudding that his dominant side gets more range of motion in external rotation (he needed it to perform optimally in his sport).
- Now, here's the cool part. Move the arms in the exact opposite direction so that he just swivels at his shoulders and goes into maximal internal rotation (the elbows remain high). In most cases, you'll find that he can get a lot more external rotation; that shoulder has just never had a reason to "go to the extreme."

As you may be able to guess, Tony is right-handed. Had he been left-handed, he'd probably be pitching in the majors right now, but we won't dwell on that!

It's not pronounced, but Tony gets a little more internal rotation on the left (near) side.
Anecdotally, I see a lot more hypermobility problems (e.g. internal impingement) in the dominant side of these athletes, and more hypomobility problems (e.g. external impingement, AC joint problems secondary to humeral anterior glide syndrome) in the non-dominant side.
Therefore, from a practical standpoint, I find that the non-dominant side responds well to added mobility work (especially the pecs, lats, anterior delts), whereas the dominant side benefits more from extra comprehensive scapular and rotator cuff stability training. By no means are these golden rules; I'm just telling you what I see pretty often. See how you stack up, and act accordingly.
Coincidentally enough, Tony has had shoulder problems with his non-dominant arm, but never his throwing arm; these problems largely resolved when he started stretching out his internal rotators and doing more external rotation exercises.
The subscapularis gets a bad rap because it's lumped into the internal rotator category, and because most people are far too tight in their "big gun" internal rotators (pecs, lats, anterior delts, and teres major), they assume that the subscapularis is best left alone.
In reality, it's actually a very important depressor and "posterior-puller" of the humeral head, and it is injured and/or shuts down with several common shoulder conditions.
Often, the pectoralis major and latissimus dorsi become the dominant internal rotators of the humerus, leading to shutdown of the subscapularis. Because the subscapularis is responsible for anterior stability of the glenohumeral joint, if it's weak, the humeral head will glide too far forward in the joint capsule. The external rotators have to fire extra to pick up the slack in humeral head depression, so posterior capsule tightness and scarring can result – and that still doesn't fix the humeral anterior glide syndrome.
All these problems combined lead to excessive pressure on the anterior joint capsule with shoulder flexion and horizontal abduction. In this scenario, it's not uncommon to see acromioclavicular joint problems; impingements; pec, lat, and external rotator strains; and even genital warts. Okay, maybe not genital warts, but I just wanted to make sure that you were still paying attention after all that functional anatomy mumbo-jumbo.
So, in short, activation work for the subscapularis is commonly indicated.
I learned the best exercise for this purpose from Syracuse-based physical therapist Michael Hope, who is so brilliant that I often wonder if he's really "The Great Creator" who actually designed the human body so that he'd know everything about it.
But I digress... give the prone internal rotation a try. Position yourself face-down on a training table with your upper arm at a 90-degree angle to your torso, and your elbow flexed to 90 degrees as well. The upper arm should be supported, and the scapula should be depressed. Simply internally rotate the humerus so that the dumbbell moves back toward the hip. If you wrist is flexing more than a few degrees, chances are that you're cheating to achieve the range of motion. If you feel your upper traps firing, you're doing this wrong; you should feel the motion on the undersurface of your scapula – right up into the armpit.
Mike Robertson and I brought the foam roller to the attention of T-Nation with our Feel Better for $10 article. In this article, we talked a lot about the self-myofascial release benefits of foam rolling, but we didn't delve into too much detail on how the roller can be used to directly improve mobility. Thoracic extensions on the foam roller are a fantastic way to normalize an excessively kyphotic curve and improve thoracic mobility.
To start, simply position the roller on your upper back about an inch below the bases of your shoulder blades. Now, put your butt on the floor, and don't let it move for the duration of the drill. Brace the abs to keep the lumbar spine from hyperextending; we don't want the range of motion to come there.
Put your hands behind your head (don't pull on the head) and pull the elbows together. Then, keeping the chin tucked, push your head back toward the floor and imagine popping the chest up to the sky. You'll feel the upper back loosen up with each successive slow, controlled rep (hold at the bottom for a count of two).
After you've finished in one spot, slide the roller up a few vertebral segments, and work on mobility at the midpoint of your scapulae. Just be sure to not do this on your lumbar spine; you don't want additional range of motion there.
I've often said that I don't believe in contraindicated exercises – only contraindicated individuals. I still stand firm with that statement, but if there is one exercise that will ever push me over the line, it's going to be the upright row. This is as internally rotated as the humerus will get, and you're elevating the humerus right into the impingement zone on every rep.
For that reason, I'll never write this into a program for a client or athlete. The dumbbell version is a slightly safer alternative, although I feel that there are still much safer ways to challenge the upper traps and deltoids. To summarize, if you've ever had a shoulder problem, suspect that you might have one now, or have other predisposing characteristics (i.e. poor posture, lots of overhead work in your daily life) that might increase your risk of impingement, you'd be wise to omit upright rows altogether.
This really is the tip of the iceberg, as I could go on all day about the subtle nuances of keeping your shoulders healthy. However, put these 16 tips to good use, and I guarantee you that you'll be less likely to email me with questions on how to fix what's already gone wrong.


