Meatheads say, “Just squat and deadlift, bro. That’s all the core training you’ll ever need.” Too bad they’re wrong.
Every so often I get in a lift at a local commercial gym. While I tend to mind my own business, the coach in me can’t help but observe my surroundings, and I especially can’t help but listen to some of the garbage that comes out of people’s mouths – particularly some of the dimwit trainers.
“All you need to do is squat and deadlift, bro. That’s all the core training you’ll ever need.”
While the meathead in me wants to agree, I feel that’s lacking in logic. A lot of people need dedicated core work to address weaknesses, imbalances, and alignment issues. I’ve seen plenty of guys with impressive physiques and decent numbers in the gym turn into a collapsed pile of Jenga pieces when forced to perform a RKC plank correctly.
At the other end of the spectrum you have those people (trainers included) who read research studies – which is great! – but then spend thirty minutes every training session activating the transverse abdominus before they even touch a weight. Not so great.
Suffice it to say, there’s nothing that attracts people’s attention more than any conversation on core training (okay, poking fun at CrossFit is right up there, too).
Categories of Core Training
Flexion gets most of the (bad) press when it comes to the discussion of core training… and for good reason. Dr. Stuart McGill’s research on spinal biomechanics on repeated flexion, and in particular loaded flexion, has very few detractors, and has helped mold the mindset of many trainers when it comes to writing programs for their athletes and clients.
For those people who spend the bulk of their day sitting in front of a computer screen in a ball of flexion and then head to the only gym only to perform more flexion, my approach is going to be universal: hammer “neutral” spine with appropriate motor control exercises, encourage more thoracic extension in their daily life, get them stronger, and work on core stability.
It’s a bit more complicated and detailed than that, but it’s not like we’re trying to cure cancer here. However, it’s because of Dr. McGill’s work that the fitness industry has taken a very “anti” approach to core training during the past decade. By that I mean that Dr. McGill espouses anti-extension, anti-lateral flexion, and anti-rotation.
Anti-Extension
Simply put, this is any exercise where you’re actively trying to resist extension at the spine. As an example, someone who presents with flexion-intolerant back pain (think computer guy) is treated quite differently from a programming standpoint compared to someone who’s on the opposite end of the spectrum and presents with more extension-based back pain (think most athletes and lifters).
While it’s a very rudimentary approach, one of the easiest ways to ascertain whether or not you’re on the extension-intolerant side of the fence is to figure out whether or not your back feels more uncomfortable when sitting for long periods of time as opposed to standing for long periods. Another way to test yourself is by doing a straight-leg toe touch. If you bend over, touch your toes, and then have pain on the way back up, welcome to the club!
Something else to consider is the mentality that we’ve had as an industry towards flexion for the past 10-15 years. Even though the “anti-flexion” mentality has helped a vast number of people get out of pain and address movement quality issues, we’ve somehow managed to force feed people into thinking that all flexion is bad.
I agree that loaded flexion is a major no-no and that people who sit all day aren’t doing themselves any favors. But if we take notice of certain trends, it’s hard to deny the rising incidence – in both the athletic and general fitness population – of extension-based facet joint issues, posterior disc, or end plate issues (spondylosis and spondylolisthesis to name a few).
As such it’s become increasingly more common to try to coach people out of an excessive extension pattern or excessive anterior pelvic tilt. We see this a lot in the athletic population. Take a look at baseball players, who spend a large part of their summer standing in extension, as well as the meathead population who tend to emphasize exercises like deadlifts, chin-ups, etc., which tend to shorten the lats and erectors. Mike Robertson has coined this “flawed active stability,” whereupon you’re cueing the body to engage the paraspinals and spinal erectors, effectively crushing the spine, in an effort to gain stability.
What’s more, in general, because of the misalignment associated with APT, it’s not uncommon for people to experience chronic pulled hamstrings, anterior knee pain, hip pain, and a myriad of other issues. For most, starting with something as basic as the deadbug can make all the difference in the world.
Deadbugs are a fantastic way to teach the body to encourage more posterior pelvic tilt while simultaneously enhancing motor control and to engage the anterior core as well as the lumbo-pelvic-hip stabilizers to do their job. However, most people suck at performing deadbugs correctly.
On first glance those don’t look too shabby, right? But with a closer look we can definitely comb through some common technique flaws that many should be able to appreciate. Before I catch flack for tucking my T-shirt into my sweatpants, just know that I did it for a reason, which was to show how most people perform their deadbugs: with an excessive arch in their lower back and with their rib cage flared out.
Admittedly, it’s hard to catch it in the video above, but if you were kneeling beside me you’d easily be able to fit your hand in between the floor and my lumbar spine. This shouldn’t happen and essentially defeats the purpose of the exercise.
Another mistake people make is that they tend to rush this exercise. Many will just flail their arms and legs around through the set. Much of the time it just comes down to slowing people down. Here’s the proper way to do a deadbug:
It doesn’t look much different than the first video, but I assure you there’s a lot to consider:
- My shirt’s still tucked in, and I’m rocking the shit out of it.
- My lower back is flush against the floor, which helps encourage more posterior pelvic tilt.
- Moreover, I’m taking a massive breath and inhaling through my nose to focus more on a 360-degree expansion into my torso. In other words, I’m not just breathing into my stomach, but also trying to expand sideways and INTO the floor as well as into my ribcage, but without allowing it to flare out too much
- From there I lower contralateral limbs – controlled, in an effort to resist extension – while forcefully exhaling my air through my mouth. I do this until ALL my air is out.
Paying a little more attention to detail does a few things:
- I slow myself down.
- The diaphragm is better engaged.
- Many don’t think of this part, but with all the air exhaled out, there’s now nothing to help stabilize the spine except the muscles themselves.
It’s not uncommon for people to literally start shaking as they proceed with their set. This is okay, as long as you maintain proper spinal position, because it demonstrates that the muscles in the surrounding area are now doing their job more efficiently.
Other Anti-Extension Exercises
1. Contralateral Core Lift
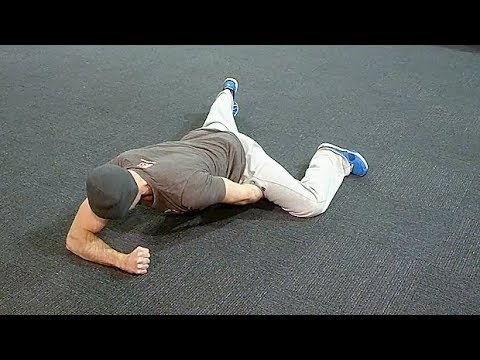
Planks are boring, and this is sort of a plank, but it’s a doozy! Not only does it force people to resist extension, but it also falls into the Dynamic Neuromuscular Stabilization (DNS) mentality and trains the core by developing stability through the contralateral shoulder and hip.
In short, there’s a transference of force between contralateral sides and training the core in this fashion helps tremendously.
- Place left palm inside the left inner thigh.
- Tuck the chin and lift head slightly.
- Push through right elbow and left knee.
- Hold raised position for 5 seconds. Repeat once more, and then switch sides. That’s one set.
- Be sure NOT to allow your lower back to go into extension.
This is a much more demanding exercise than it looks and there’s a certain level of strength that’s required, but for those who can do it correctly, it’s awesome.
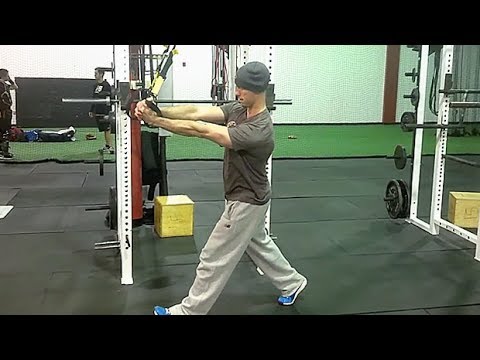
2. Vertical Cable Press
- Start with a cable apparatus set-up in its highest position with a rope attached.
- Step away a few feet with a half-kneeling stance with the rope positioned on your shoulders.
- Press straight up (not out; this isn’t a triceps extension) until your arms are entirely straight.
- Concurrently, you’re going to resist your lumbar spine from going into extension. You need to brace your anterior core and squeeze the glute of the trailing leg.
- Perform 5-6 reps with legs staggered one way, then switch and perform 5-6 more reps.
Anti-Lateral Flexion
Anti-lateral flexion exercises are those in which we resist lateral-flexion or side-bending, e.g, loaded carries. For my money, you can’t go wrong with carries. There are a lot of benefits to performing carry variations – grip strength, hip stability, building a monstrous upper back, not to mention they just look cool – but resisting lateral flexion is number one.
When done correctly, there aren’t many things that parallel carries. Unfortunately, most trainees go way too heavy and completely defeat the purpose of the exercise. If you’re a competitive strongman or your last name ends with He-Man, I don’t give two shits how you perform your carries. You just need to get the job done no matter how it looks. Everyone else, though, listen up.
The objective is to stay completely upright with absolutely no leaning. The latter part is why I tend to prefer offset or suitcase carries because you really have to fight not falling over.
Because we deal with a lot of athletes and clients who present with sloped or depressed shoulders and who are stuck in extension, we’ll almost always cue them to “lock” their ribcage down (chest is still up) and to slightly shrug the weight so that they’re not being pulled down into shoulder depression.
We’ll typically revert to kettlebell carries – racked carries, bottoms-up carries, and/or waiter carries – which will help keep people out of an aberrant posture.
Additional Anti-Lateral Flexion Exercises
1. Off-Bench Oblique Hold with Pulse
- Lock your feet under the crossbar of a standard bench press.
- Extend your torso straight out with your hips “stacked.”
- Holding a 10-pound plate to your chest, simply press the plate out in front of you until your arms are fully extended, and then return back to starting position. Perform 8-10 reps per side.
2. Offset Tall Kneeling-to-Standing Overhead Dumbbell Hold
- Starting in the tall kneeling position with one dumbbell held straight overhead, transition to the standing position while making sure to keep abs and glutes engaged, rib cage down, and as little motion in the torso as possible.
- Perform 4-5 reps with the dumbbell on one side of the body, then repeat the same process on the other side.
Anti-Rotation
These include any exercises that resist rotation in the lumbar spine. Here some popular options starting with less challenging ones from the floor (more stability) to standing (less stability):
Learn to Breathe
Breathing is all the rage lately in the fitness industry. It seems learning how to breath correctly can help with everything from curing someone’s chronic back pain to helping them set deadlift PRs. About the only thing proper breathing doesn’t cure is ebola. Cheekiness aside, there’s a lot of logic behind learning to breath correctly. We take over 20,000 breaths per day, and it stands to reason that if each one of those breaths is done inefficiently, some bad things could happen.
The people over at the Postural Restoration Institute (PRI) have been around for well over two decades, but it’s only been within the last 2-3 years that their stuff has gotten a bit more exposure. While even Gandalf would have a hard time understanding their entire philosophy, I can tell you that one of their major umbrella themes is to understand that, based off our anatomy, the human body will never be symmetrical.
Taking things a step further, it’s about recognizing that we’re inherently designed (think organs, liver on one side, spleen on the other; more prominent diaphragmatic attachment points on right side compared to left) in such a way where asymmetry is inevitable, and that how we breathe plays a major role in that.
PRI tries to teach people how to breathe more efficiently, which in turn, in conjunction with their corrective modalities, will help attempt to bring them back to neutral. People who exhibit more extension-based back pain tend to have an over-active or dominate Posterior Extensor Chain (PEC Posture), and as weird as it sounds, unloaded flexion is one of the best ways to help them.
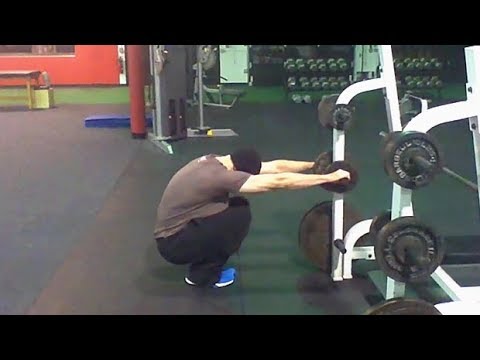
As such, tossing in some dedicated breathing drills to help teach people to “breathe into their back” can make a world of difference. Following are some drills we’ll tack onto an extended warm-up with our athletes and clients before they actually pick up a barbell. They take all of maybe 2-4 minutes to complete,and then it’s off to go crush some weights.
In the video immediately above, I’m going into a deep squat with my feet together and using the front of my thighs as a guide or feedback to keep my rib cage down. Once in position I take a deep breath through my nose in an effort to drive my “sternum to the back wall,” which helps turn my upper back into a dome. I then forcefully exhale all my air to help engage my diaphragm more effectively. With both drills I’ll shoot for anywhere from 5-10 breaths.
Programming
If you’re following a three-day per week training schedule, all you need to do is perform one of the categories with each training session. The one constant would be the breathing drills.
- Day 1: Breathing drill as part of extended warm-up, Anti-Extension movements
- Day 2: Breathing drill as part of extended warm-up, Anti-Lateral Flexion movements
- Day 3: Breathing drill as part of extended warm-up, Anti-Rotation movements
If you’re following a four-day per week cycle, it would look like this:
- Day 1: Breathing drill as part of extended warm-up, Anti-Extension movements
- Day 2: Breathing drill as part of extended warm-up, Anti-Lateral Flexion movements
- Day 3: Breathing drill as part of extended warm-up, Anti-Rotation movements
- Day 4: Breathing drill as part of extended warm-up, Anti-Extension movements
Note: In the first training session of the following week you’d include an anti-lateral flexion exercise, and then recycle as needed.
Final Rationale
Far too many people try to make training more complicated than it has to be, especially when it comes to core training. While lifting heavy requires a tremendous amount of core strength, that’s only half the battle. It’s still important to include dedicated core exercises that help to not only address weaknesses and imbalances, but also force us outside our comfort zones.
Try to make a concerted effort to include one exercise from each category throughout the week and I promise good things will happen.


