

Getting results is hard enough when you're healthy. It's damn near impossible when you're battling your own body. Pain puts the brakes on your body's ability to move and perform. But if the big lifts hurt you, you can still make progress. Here's how to make simple modifications to three common lifts so you can train around pain, get healthy, and get results.
While the front squat is great for building the quads and glutes, most people shy away from it because of the mobility it requires. Some have difficulty with the setup and the pain it creates in the elbows, shoulders, wrists, knees, and lower back. Here are two setup modifications so that you can train the front squat hard and keep it pain-free.
The traditional front rack position (bar supported by the fingers, wrists bent back) isn't possible for many. Unless you're a weightlifter or CrossFitter, there's no reason to put your fingers, wrists, and elbows in this position. Forcing it can lead to wrist stress, painful torqueing at the elbows, and a lack of proper shoulder centration, all of which may alter the mechanics of the spine, hips, and lower extremities.
The Fix – Use straps
- Connect two straps to the bar and pull them tight to take the slack out.
- Wrap each hand in the strap and grip them tight with a neutral wrist position.
- Allow the bar to sit on the front shelf of the shoulders, stabilized by the hands.
- Drive your elbows up.
At this point your hands should be over the bar in a neutral position. DON'T put the straps on your wrists and then attach them to the bar. From this position, you'll front squat with the shoulders in a neutral position and avoid unnecessary stress on the shoulders, elbows, and wrists.
Since the front squat requires a more upright torso angle to support the bar across the front of the shoulders, many lifters tend to bring their weight too far forward.
As the body drifts forward, two issues arise. First, the torso loses its stability and the shoulders protract, internally rotate, and flex at the thoracic spine. This lack of stability drips force output, making you weaker. It also places your shoulders and spine in risky positions.
The second concern? As the body falls forward, the tibial angle of the lower leg is increased, causing the knees to drive too far forward, taking the brunt of a force through these joints. This can have a negative impact on patella-femoral health and can flare up the soft tissues surrounding the knees, causing chronic inflammation.
The Fix – Slightly elevate your heels
Using small plates like fives or tens under the heel, lifters will be able to sit back into their hips during the squat, decrease the forward lean and instability, and decrease the amount of shearing on the patella.
If you think the problem here is a lack of ankle mobility, think again. Sure, limited dorsiflexion can alter squat mechanics, but the more intriguing phenomenon during the heels-elevated squat is the alteration of the kinetic chain and the distribution of weight over the center of mass that provides more stable "non-threatened" positions at the knees, hips, pelvis and spine.
Don't be surprised if using a slightly elevated heel position unlocks squat depth, decreases that ugly butt wink, and leads to hypertrophy of the quads and glutes. Oh yeah, and it'll also feel a lot better.
Everyone should hip hinge to some extent, but don't think it has to be done with a maximally loaded barbell off the ground in a conventional stance. Here are two simple tips that'll allow you to retrain your deadlift pattern and build real strength instead of rehab bills.
Using one overhand and one underhand position allows lifters to pull more weight. But the underhand grip also has the nasty tendency to overload the long head of the biceps in a vulnerable forward-shoulder position that's been the cause of many powerlifting injuries.
If your purpose for deadlifting is to pull a maximal weight in competition, go for the mixed grip. You've likely examined the risk-reward ratio and know what you're dealing with. But for most, the benefits of the mixed grip don't outweigh the risks.
The Fix – Use the double overhand grip
Training in a more symmetrical position and allowing the shoulders to stabilize and centrate under loading is transferable to nearly every lift and physical activity.
Though this grip may be more limiting in terms of loading abilities than its mixed counterpart, the strength gain will be more transferable and functional for building resilience and preventing not only biceps injuries, but injuries across the board.
Depending on your stance preference, either sumo or traditional, you'll place your hands about shoulder-width apart. To know where you should be, drop your arms down to your sides and extend your thumbs on each hand touching the sides of your legs. There is your starting position. This is approximate, so feel free to move your grip in and out a half inch at a time to find your perfect overhand grip width.
Far too many lifters pull from the ground when they shouldn't be. If you have to round your back, shift your weight, and cause yourself pain just to move some iron off the floor, chances are your depth is less than ideal.
The Fix – Elevate the bar to maintain a neutral spine
One of the most effective deadlift modifications you can make is pulling from a higher position. What position is ideal? It depends on your body, your skill level, and your goals. Not everyone is built the same, has the same goals, or experience, so why would everyone deadlift with the bar from the same height? The answer is that they shouldn't.
There's a simple test to determine your optimal pulling height: the bodyweight hinge.
The Body Weight Hinge Test
- Place your feet in your deadlift stance.
- Brace your spine into a neutral position, tense the glutes and hamstrings.
- Slowly drive your hips back, maintaining a neutral spine. Keep your hands vertical to the floor at your side.
- Hinge as far back as possible until you can no longer maintain spinal position.
- At terminal non-compensated end range, bring your hands down to your legs.
- Note the height of your knuckle of the second finger relative to your leg.That's your starting point based on a bodyweight test.
This is a good place to start, but the real test is getting load on the bar at that height and monitoring your spinal position. A vast majority of people do well pulling from between 3-8 inches below the kneecap. Take the test, then try it out in training, and modify based on spinal position and stability.
As any lifter who has chased a PR knows, the bench press can leave your shoulders achy and even injured. The cause? Usually the wrong technique, improper setup, and far too much volume and frequency. Here are two common problems and the simple modifications that will ameliorate them.
Many lifters have no idea where their optimal hand width should be on the barbell. Using the grip that allows you to press maximal loads can actually lead to pain and injury.
The Fix – Narrow your grip
Your ideal hand placement is going to depend on your body and current physical presentation, not your willingness to move max weight with ugly form.
A wider grip increases front-sided shoulder stress due to larger moment arms, but also accentuates the amount of emphasis placed on the pecs and anterior deltoid, which are usually overworked to start with. Using a narrower grip places the shoulders in a more neutral and centrated position. It also distributes more muscular force into the triceps, which directly reduces the force requirements of the pecs and delts to complete a lift.
Err on the side of caution and go narrow. Start emphasizing a narrow-grip bench press in blocks of your training. Using a thumbless "false grip" on the bar can also get the shoulder in a neutral position by reducing the carrying angle between the upper arm and the torso.
Most lifters don't create enough full body tension on the bench press. The best way to protect the shoulders is by optimizing the position of the entire body.
While taller lifters have ability to use full body tension by driving their feet hard into the ground, many times they don't. Externally rotating the hips with full glute and hamstring contraction can place the pelvis into a stable position and allow for better force contact through the feet into the ground, and ass into the bench. This proximal stability will create a more solid position for the shoulders during the press. But that strategy doesn't work for shorter lifters. This one does.
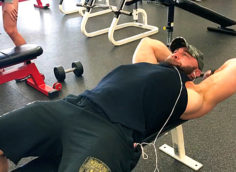
The Fix – Elevate your feet
The standard bench height is a common problem for many lifters, especially those under about 5'8", due to the lack of solid ground contact with the feet and position of the hips and pelvis.
Using boxes or weight plates, elevating the "floor" under the feet allows the hips to be positioned in a more neutral alignment. The lower body and pelvis are more able to create spiraling torque and tension.
I realize that dragging over a few 45 pound plates to place under your feet every time you bench press is a pain, but it'll be worth it when you finally feel what it's like to bench press with proper stability and tension through the entire body. It'll translate into less shoulder joint stress and stronger, more solid lifts.
related posts

Growth Factor Chest Training
Tip: Tricep 30's

Fast Workouts for Fast Results
