

1 – Barbell Push-Up with Horizontal Band Resistance
Besides being a challenging core and push-up exercise, this variation provides several unique benefits. First, it eliminates sagging hip syndrome because it reinforces a tall hip and hollowed core position. The amount of anti-extension is magnified due to your body continuously resisting the band pulling on the barbell.
Second, the pulling force is acting directly on the scapula and shoulder stabilizers. If you don't fully depress and retract your shoulder blades, the bar will literally pull out and away from you, leaving you plastered to the floor.
It also teaches you to screw the elbows down and back while simultaneously using a pronated grip (a common problem for many lifters). This can even help your bench press form. It has direct carryover due to the same gripping mechanics. In fact, to stay locked in, you may involuntarily feel like you're pulling the bar apart, which is a common coaching cue used by powerlifters to dial in their bench form.
2 – Anti-Seesaw Push-Up
One drawback to push-ups is their inability to gauge symmetrical loading. It's hard to tell if one side is doing more work than the other. For example, you'll quickly notice any asymmetrical pressing when doing a barbell press because the bar will begin to tilt. But push-ups don't provide this feedback.
One variation that exposes this imbalance is the seesaw or anti-seesaw push-up. Place a barbell across a bench and perform push-ups on the bar. Favoring one arm or pressing more from one side of your body will produce an immediate tilt and provide useful feedback, allowing you to correct this neuromuscular imbalance.
3 – Bottoms-Up Push-Up on Plates
These require strict form, smooth muscular contractions, intense core activation, and efficient horizontal pressing technique. Any shifting, cheating, or deterioration in mechanics can end in a sudden face-plant.
Because they can be a bit tricky, you should only do these once you feel your mechanics are spot on. They can be performed on kettlebells, Iron Grip style plates, and bumper plates. Forty-five pound Iron Grip style plates are the most difficult variation. Their tallness and thinness makes them very challenging to stabilize.
4 – Ledge Push-Up
This is a subtle modification, but it's incredibly effective at improving push-up mechanics, mainly because you don't have to concern yourself with knocking your face into the ground while using the standard hand-to-floor placement.
Although the upper torso and face should stop millimeters above the surface at the bottom of a standard push-up, you'll often see people pull the head up, sink their hips, or shorten their range of motion as a means of subconsciously avoiding any harm to their face.
The ledge push-up eliminates that fear altogether, allowing you to comfortably hone in on the ideal push-up mechanics without worrying about spoiling your imagined good looks.
5 – Feet on Ball Push-Up
Foot mechanics are critical when it comes to push-ups. This variation ensures all aspects of foot positioning and toe activation are dialed in.
Placing the feet on the ball forces you to get tall on your toes rather than sagging towards your heels because the movement becomes almost uncontrollable with improper foot mechanics. It's also excellent for reinforcing strong core and hip activation. If you allow the hips to sag or the lower body relax, you'll find it impossible to perform these.
6 – Medicine Ball Chest-Squeezing Push-Up
If you have trouble feeling your pecs contract during push-ups, your mechanics are in need of some work. Proper technique will help maximize chest activation.
However, some people may simply lack the appropriate muscle-mind connection and may need a variation to help wake up the appropriate neural connections to the pectorals. This variation provides the perfect solution.
Rather than putting your hands directly on top of the ball, position them on the sides of the ball, closer to the base. This requires incredible levels of pec activation throughout because you're essentially holding a maximal tension isometric flye while doing push-ups.
Although this can be done on a Swiss ball, the smaller medicine ball helps to keep the elbows from flaring out too much. It's also nearly impossible to lock out on this, which makes it useful for eliminating excessive scapular protraction at the top.
Besides being great for hypertrophy, this variation teaches you what it feels like to create strong pectoral activation when performing push-ups. If this doesn't get your chest screaming, nothing will.
How to Add Weight
When using extra weight, proper placement of the load is important to make sure your mechanics stay locked in.
Placing the load too high up on the torso impedes natural scapulohumeral rhythm by pressing against the upper back and scapula. This can create an overly confined shoulder position where you can't properly position your glenohumeral joint.

Plate Too High
This can cause inflammation around the shoulder and a reduction in the amount of force you can produce. Push-ups are also one of the only horizontal pressing movements where the scapula aren't locked or fixed against another surface like a bench. Placing the load too high on the torso eliminates this unique feature.
Rather than placing the load high on the middle and upper back, the weight should be placed lower towards the center of mass, near the hips and low back. This forces you to keep the hips tall because a sagging hip position will cause the weights to slide down and off the body.
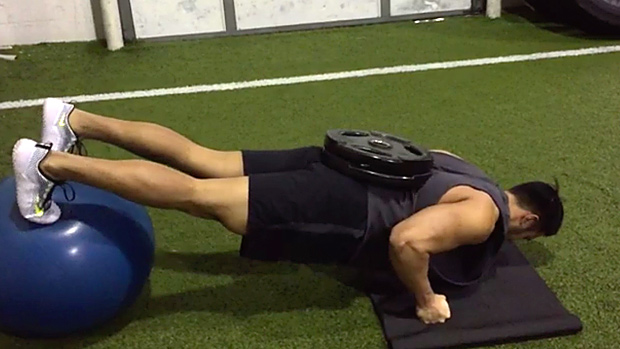
Correct Plate Position
The direct loading near the lumbar region promotes greater anti-extension and activation in the core as a means of resisting intense vertical forces acting directly on the spine. The low back and hip region also provides a perfect groove for the load to sit in without shifting, especially when you're using optimal spinal alignment with slight yet natural lumbar curvature.
Another benefit is that the low back is narrower than the upper back so you'll be alerted to any deviations in form. Lateral shifting of the hips, asymmetrical pressing, unilateral dipping of either hip, or wiggling of the torso will cause the weights to tilt and slide off.
The lower loading placement also allows for optimal elbow positioning, particularly when using larger 45-pound plates. When the elbows are tucked close to the body (as they should be), the triceps and elbows will run into the plate at the bottom of the movement, creating a slightly restricted position. By placing the plates lower on your torso, the elbows should clear the weight plate, allowing unencumbered movement.
How To Add Bands or Chains
Stretching the bands across the upper back, in-line with the chest, promotes a hand position that's too far forward (close to the neck), which leads to scapular elevation and elbow flare.

Band Too High
When using band resistance (or chains), place the band towards the mid-lower back to produce a better angle of pull against the arms and hands.

Correct Band or Chain Position
This helps you get a better elbow tuck and depression of the scapula.
related posts

Question of Strength 39

Arm Yourself: Poliquin Training for Biceps & Triceps

The Nutritional Dr. House: Case 1
